How to Plan a Complete Solar Panel Mounting System for Your Roof
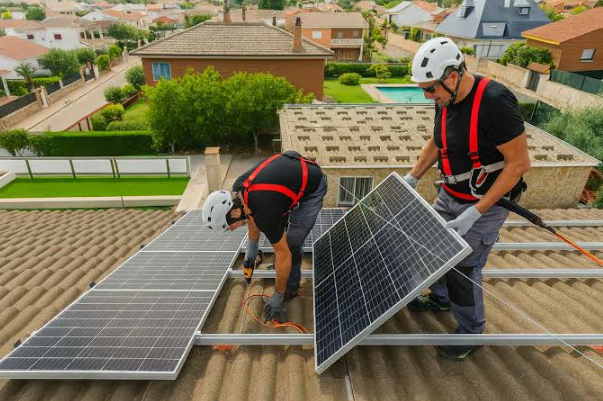
Switching to solar energy is one of the smartest investments a homeowner or property developer can make today. But while most people spend weeks researching solar panels, inverters, and battery storage, the mounting system, which is the hardware that physically secures everything to your roof, often gets overlooked until the last minute. A poor mounting choice can lead to leaks, structural damage, voided warranties, and costly rework.
Before anything else, you need to think about how the wiring will travel safely from your panels to your inverter. Using a quality Roof Tech’s solar conduit mount keeps electrical conduit secured firmly to the roof structure, protecting wiring from wind, UV exposure, and water intrusion while maintaining a clean, professional installation. Getting this detail right in the planning stage saves significant time and money down the road.
In this guide, we walk through every key factor to consider when planning a solar panel mounting system, from roof compatibility to rail selection, load calculations, and long-term maintenance. Whether you are a homeowner going DIY or working with a solar installer, these essentials will help you make informed decisions.
1. Understanding Roof Type Compatibility
The first step in planning any solar mounting system is understanding what your roof can and cannot support. Not all mounting solutions work on every roof type, and using the wrong system can lead to leaks or structural failure.
Asphalt and composition shingle roofs are the most common residential type and are compatible with a wide range of rail-based and rail-free systems. Flashed feet or waterproof base mounts are essential here to prevent moisture intrusion at penetration points. Metal roofs, whether standing seam, trapezoidal, or corrugated, are actually ideal for solar because of their durability and longevity. Standing seam profiles can accept clamp-on mounts that require zero penetrations, while corrugated profiles need brackets designed to sit in the ribs. Flat or membrane roofs, common on commercial buildings, typically use ballasted racking that avoids penetrations altogether. Tile roofs made from Spanish, concrete, or slate materials require specialized hooks or replacement tile mounts and are more labor-intensive because of the risk of cracking tiles during installation.
It is important to connect with a reputable solar installer or roofing professional before finalizing your approach. They can assess your specific roof structure, slope, and material to recommend the right system for your situation.
See also: The Impact of Artificial Intelligence on Everyday Life
2. Rail vs. Rail-Free Mounting Systems
Once you understand your roof type, the next major decision is whether to use a rail-based or rail-free mounting system.
Rail-Based Systems
Rail mounting systems use aluminum extrusions that run horizontally across the roof, with panels clamped onto them. They offer greater flexibility in panel layout and spacing, easier adjustment during installation, better support for heavier panels, and built-in pathways for wire management. Rail systems are the go-to choice for most residential and commercial installations because they are forgiving during layout adjustments and accommodate a wider range of panel sizes.
Rail-Free (Direct Attach) Systems
Rail-free systems attach each panel directly to the roof via individual mounts at each corner or mid-frame point. They are faster to install and have a lower profile, but they offer less flexibility. They work best when the panel array is simple and uniform, and the roof has consistent rafter spacing that lines up predictably with the panel layout.
For most homeowners, a rail-based system offers the best balance of flexibility, structural strength, and ease of installation.
3. Load Calculations: Wind, Snow, and Structural Capacity
One of the most technically important steps in planning a solar mounting system is ensuring that both the mounting hardware and your roof structure can handle the additional loads the panels will create.
Wind Load
Solar panels installed on a roof create uplift and lateral forces, especially during high winds. The wind load your system must withstand depends on your geographic location and local wind speed requirements, the tilt angle of the panels, the height of the installation above ground level, and the setback distance from roof edges. Many mounting manufacturers provide stamped engineering letters and span calculators that allow you to determine safe attachment spacing for a given wind load zone. Always verify that your installation meets or exceeds local code requirements.
Snow Load
In regions that experience heavy snowfall, the combined weight of panels and accumulated snow can be substantial. Solar panels are generally rated to handle significant snow loads, but the roof structure and mounting attachment points must also be capable of supporting the additional weight. If your roof is older or shows any signs of structural weakness, have a structural engineer assess it before installation.
Roof Structural Capacity
Most residential roofs are designed to handle standard live and dead loads, but adding a solar array introduces new point loads at each attachment location. Spacing your roof mounts farther apart reduces the number of penetrations but increases the load at each point. A qualified installer or engineer can help you find the right balance.
4. Waterproofing and Roof Penetrations
Every point where a bolt, screw, or lag enters your roof is a potential water infiltration risk. This is one of the most critical aspects of any solar mounting installation, and it is where low-quality systems most often fail.
Look for mounting solutions that incorporate integrated waterproofing technology. Some of the best systems on the market use a sealed base or flashing system that creates a watertight barrier around the penetration point, eliminating the need for manual caulking that can dry out and crack over time. You want a pre-applied or integrated sealant layer that compresses against the roof surface when the mount is tightened, mounts that work with standard roofing flashing to redirect water away from the penetration, and aluminum or stainless steel hardware that resists corrosion and maintains its seal over decades.
Avoid systems that rely solely on rooftop caulk or sealant tape applied during installation. These degrade over time and are a leading cause of roof leaks in solar installations.
5. Wire Management and Conduit Routing
Once panels are mounted and generating power, all of that electricity needs to travel safely to your inverter and electrical panel. How you route and protect the wiring matters enormously for both safety and aesthetics.
DC Wiring Under the Array
The wiring that connects your solar panels typically runs along the rails beneath the panel array. Rail systems often include built-in wire management clips or channels that keep cables neatly routed and protected from UV exposure and wind vibration.
Conduit Routing on the Roof
Where wiring transitions from beneath the panels to running exposed on the roof surface, it must be protected inside electrical conduit. This conduit needs to be securely fastened to the roof at regular intervals to prevent wind damage and movement. A properly installed conduit mount keeps your conduit flush and secure, giving the installation a professional appearance while protecting the wiring inside. Neglecting this step is a common shortcut that leads to conduit vibration, wear, and eventual wiring damage.
Inverter Location
String inverters are typically mounted on an exterior wall or in a garage near the main electrical panel. Microinverters and DC optimizers are mounted directly on or beneath the panels. Your choice of inverter architecture will affect how much conduit run you need to plan for.
6. Choosing the Right Rail System
If you have decided on a rail-based mounting approach, the next step is selecting the right rail product for your installation. Modern rail systems have evolved well beyond simple aluminum extrusions. Comprehensive mounting systems now integrate waterproofing, wire management, and structural flexibility into a single product line.
When evaluating rail systems, it helps to check whether the system and its mounts are designed for your specific roof material, what span rating the rail carries between support points (a longer allowable span means fewer penetrations), whether attachment points can be adjusted after the rail is installed, whether the base mount includes built-in waterproofing, and whether the system comes with stamped engineering documentation for your wind and snow zone.
A quality rail mounting system simplifies installation significantly. Rather than sourcing individual components from multiple suppliers, a well-designed system provides everything from the roof base mount to the rail to the panel clamps as a tested, warranted assembly.
7. Maintenance and Long-Term Reliability
A solar installation is a 25 to 30-year investment. The mounting system needs to last just as long as the panels themselves. Poor-quality hardware can corrode, loosen, or fail well before the panels reach the end of their useful life.
Inspection Schedule
Plan for an annual visual inspection of your mounting system. Look for loose or corroded fasteners, any movement or shifting in the rails, signs of water intrusion around mount base points, and any damage to conduit or its attachments. Catching small issues early prevents them from becoming expensive repairs.
Material Considerations
All hardware exposed to outdoor conditions should be made from marine-grade aluminum or stainless steel. Avoid systems with mixed metals that can cause galvanic corrosion over time.
Warranty Coverage
Just as with solar panels, the warranty on your mounting system matters. A manufacturer that stands behind their product with a long-term structural warranty is a sign of confidence in their design and materials. Be cautious of mounting systems that offer only a short warranty period, as it may indicate corners were cut in manufacturing.
Summary
Planning a successful solar panel mounting system requires much more than picking the cheapest hardware available. From roof type compatibility and waterproofing to load calculations, rail selection, wire management, and long-term maintenance, every decision has real consequences for the safety, performance, and longevity of your solar investment.
Take the time to evaluate your roof structure, work with qualified installers, and select mounting hardware that is engineered for your specific conditions. Pay attention to how conduit and wiring will be managed on the roof surface, and choose a system with integrated waterproofing at every roof penetration. By getting these details right, you can look forward to decades of trouble-free clean energy generation from your rooftop solar system.